Halloween is steadily approaching and despite hitting several parties this past weekend, the little zombies are still coming Wednesday for their loot.
How do you make it look like you aren’t that creepy reclusive candy-hoarding curmudgeon? Lil’ geeky Jack-O-Lanterns!
Here’s a quick no-carve pumpkin display that give you instant Halloween spirit that looks like you put much research and thought in it. You don’t have to tell people I did it for you.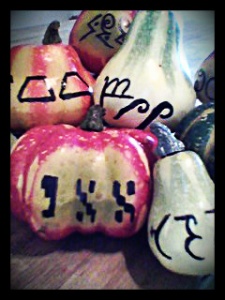
Step One
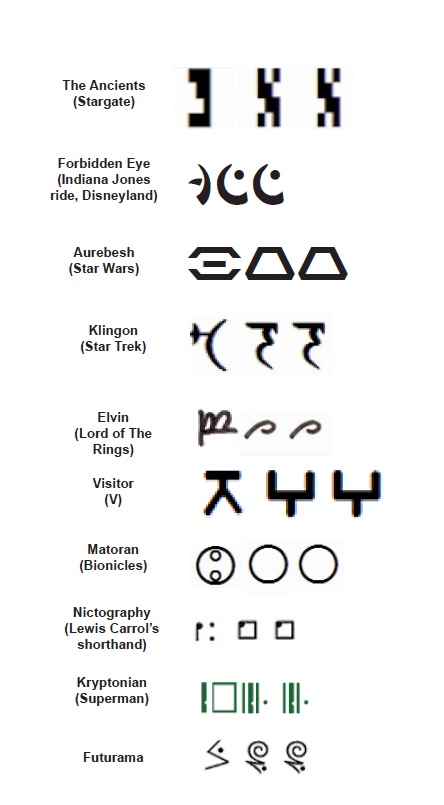
Grab a bag a mini-pumpkin (real or fake) and a black Sharpie marker or acrylic paint if you are particularly good with a brush, and find some fictional geek alphabets online, like Klingon, Aurebesh, Kryptonian, etc.
Step Two
Using the language of your choice, or choosing one from the little suggestion chart I put together, write or paint the word “BOO” on each one. Make several different ones if you have time.
Step Three
Line them up on a windowsill, pile them creatively on a shelf or doorstep, or display them through the house where everyone can see them. Then enjoy the conversations that arise from those who either A) get the message and think you are the coolest person ever, or B) don’t get in and think you are the weirdest person ever. Either way — it’s a win!
If you’re really inspired, these also look great carved into full-sized pumpkins for those rare non-procrastinating types.I hope you liked these small tips this Halloween season, I’m planning a couple when Christmas and the holiday season rolls around. Be watching, and be careful with those little geeklings this Halloween.
Trick or Treat!
Not done with decorating? Give our DIY Halloween Decorations – Countdown Garland a try and wind down with Ten Family Friendly Halloween Movies to help lull the kiddos into a candy coma! Afterward, you can set the mood with Five Albums to Flesh Out Your Halloween Playlist and huddle under the covers with Netflix and Chilling – Halloween Movie Edition. Any other off-beat Halloween music suggestions to throw our way? You can let us know on Twitter @SubCultured or come party like its 1599 in our Discord server!
Quick disclaimer: I’m a jack-o-lantern freak, and I tend to go overboard each year trying to make geeky, elaborate art, especially since there are some great pumpkin stencils out there to be had.
I have been politely confronted on this obsession in past years by my husband who (for the sake of space and sanity) told me to tone down the number of glowing orange things in our home. I love my family and will try to be good…. but I HAVE TO USE SOME OF THESE STENCIL PATTERNS! Ergo, here’s a great use for them…in just three steps!

Step 1
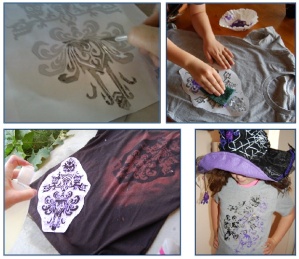
Print out, laminate and cut out that stencil. If you don’t have laminate, go with the “poor man’s ” version I like to use…clear packing tape. I do recommend this before cutting it out, so you can re-use the patterns, especially since those complicated ones that may take some time. I use an X-acto knife for the more detailed patterns, but easier ones can be done with just plain scissors. Since I talked to Ray Keim earlier this month, I used his fantastic “Haunted Mansion Wallpaper” stencil as an example (find it at haunteddimensions.raykeim.com/index250.html).
Hint: for “floating” elements in stencils (eye pupils, etc.) attach a thin strip of tape from it to the rest of the pattern to keep it in place. You can fill in any flaws later, if you need.
Step 2
Place your stencil on the shirt where you want it and lightly sponge some cloth paint over it. If you have a black or dark-colored shirt, take a spray bottle of half bleach/half water and gently spray the pattern instead. You’ll be pleased with the results. Do this outside, away from things (and pets and people) that you don’t want to soil or destroy. For the bleached shirt, rinse with cool water and let dry.
Step 3
For a little extra design, take a handful of a different-colored cloth paint, stand back and flick it on the shirt for a splatter effect.
Wow, that’s pretty much all there is to it, and you’ve got yourself some wearable, holiday themed art!
Want to find more patterns? my top three Pumpkin Stencil site picks (for today, at least) are:
Zombiepumpkins.com. Around 275 patterns. Some are free, but the rest are worth the site’s subscription price. There are whole sections dedicated to superhoroes and movie icons including Marvel characters, Batman, Hellboy, The Crow, Star Wars, Alan Moore’s “V” (from “V for Vendetta”), Rick Grimes from “Walking Dead,” Ash from “Army of Darkness” and plenty of zombie and Halloween classics. Mucho kid-friendly choices, too like Tim Burton images, Monster High, Paranorman, Harry Potter and video game icons. Go crazy.
StarWars.com. The “official” Star Wars blog has a pdf for 11 pumpkin stencils of varying difficulty from easy sillhouettes to some pretty challenging portraits (Tusken Raider…yikes). My favorite is the Mandalorian symbol, but the Rebel and Empire emblems are both cool and easy. Download them puppies here: starwarsblog.starwars.com/index.php/2011/10/24/star-wars-pumpkin-stencils/.
Thinkgeek.com. Each year, everyone’s favorite geeky catalog hosts a fan-made pumpkin stencil pattern contest, and the results are incredible. The best part is, they keep all the winning stencils from past years available, so there’s is more and more geeky goodness offered each season. I don’t even know where to start; video games, movies and television icons, techy art and even a nice portrait of H.P. Lovecraft for those literary geeks. I made the double-sided MST3K pattern last year and it turned out nifty. Find them at thinkgeek.com/blog/2012/10/
Try this fashion craft with any of these, or get yourself a giant vegetable orb (or twenty) and dig in! Looking for other Halloween madness? Try our Ten Family Friendly Halloween Movies to help lull the kiddos into a candy coma! Afterward, you can set the mood with Five Albums to Flesh Out Your Halloween Playlist and huddle under the covers with Netflix and Chilling – Halloween Movie Edition. Any other off-beat Halloween music suggestions to throw our way? You can let us know on Twitter @SubCultured or come party like its 1599 in our Discord server!
This is one I idea I actually saw on a meme (thank you, George Takei), so I decided to improve on it a little bit…. and it is still incredibly easy.
Posted as a practical joke idea, these little glowing eyes turned out to be really effective, cheap, and simple last-minute Halloween decorations. The best part is, you can make a ton of them in a short time! You could pop out a good 20 of these just watching Corpse Bride in an afternoon.
 Step 1
Gather some old toilet paper or paper towel rolls (if you don’t have any now, you are bound to soon). Use some scissors or an X-acto Knife and cut a pair of eye holes in each one. If you use paper towel rolls, cut them in half first so they are the right size. If you want, you can color them black with a marker or craft paint.
Step 2
Cover each end with some electric tape or duck tape, but don’t close off one end completely yet.
Step 3
Stick a glow stick in the tube and finish closing off the ends with the tape.
Viola! Instant beastie eyes, ready to stick in bushes, trees, tall grass, windows and other dark shadows. They don’t look like much on their own, but hidden in the foliage at night, they have an effect that is both eerie and kind of serene.
They’re watching you…
Looking for other ways to show off your spooky side? Try our DIY Glowing Beast Eyes or Halloween Countdown Garland! When you’re done, wind down with Ten Family Friendly Halloween Movies to help lull the kiddos into a candy coma! Afterward, you can set the mood with Five Albums to Flesh Out Your Halloween Playlist and huddle under the covers with Netflix and Chilling – Halloween Movie Edition. Let us know about your DIY Decor on Twitter @SubCultured or come party like its 1599 in our Discord server!


