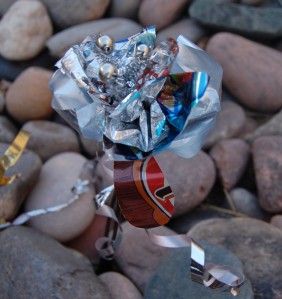
As I’ve said before, is there anything more touching than a hideous prawn lovingly making a little tin flower for his soul mate in the midst of a South African landfill?
Fans of the alien drama and all-around love story “District 9” know there isn’t. Therefore, here’s the perfect display of Mother’s Day affection, Wikus Van Der Meer-style, for all those Moms, Wives and Mee-Maws with exceptional taste in discarded metallic trash.
I realize none of you (to my knowledge) have alien pincer-like claws capable of both ripping apart enemies and lovingly bending steel scraps into delicate floral designs, so I’ve made Wikus’s idea a little more human-friendly.
Anyone who has ever made a tissue paper or bathroom tissue flower in grade school should be able to do this without too many problems. If you haven’t then (sniff) I’m sorry you’re lacking this happy childhood memory, but this should still be easy. I made this craft with my 9-year-old (who I won’t even let see “District 9” for a few years) and she did a stellar, or should I say interstellar job!
Let’s get started:
Step One: Scavenge for Supplies
To make this flower look metallic like Wikus’s, find any type of easily pliable metallic wrappings and assorted trash such as:
Fruit drink bags
Aluminum foil
Candy wrappers
Wrapping paper, or anything else you think might fit. Be creative and think “WWWD” What Would Wikus Do?”
 Also, you will need wire coat hanger or metallic pipe cleaner for the stem.
Optional materials include an aluminum can for the leaf, beads from old craft projects or broken jewelry, ribbons or other embellishments you might find lying around.
Step Two: The Flower
This is the part that should stir up those tissue paper memories. Cut your found wrappings in rectangles about 4”x 6” in size. You can use an old photo for a template, if you need.
 Next, stack about three or four rectangles on top of each other and fold them like a paper fan. If you can, use pieces with some variance in color just to make it more interesting. When you have folded the entire paper, pinch it in the middle so it resembles a little metal bow tie.
Step Three: The Stem
Bend your coat hanger (or pipe cleaner if working with younger kids) over the pinched middle of the “bow tie” shape. Twist it so it secures the papers tightly. If you are working with a coat hanger, you might want to do this with a pair of needle nose pliers. The pipe cleaner you can do easily with your hands. If you use a coat hanger wrap the bottom with a little electric or Duck Tape so the end isn’t so sharp.
Once the flower is secured, peel the layers apart to create your flower shape. This is done by gently pulling each two layers in the opposite direction for those novice flower makers. You can finalize the shape a little better when you are done with the whole craft.
Step Four: The Leaf
Here’s where the aluminum can comes into play. With a sharp pair of scissors you don’t mind ruining a little, cut a long teardrop shape from the can. Again, if you are making this with younger kids, use some of your leftover wrapping paper, foil, etc. for a safer option.
Next, take the “leaf” and place it up against the coat hanger stem, and secure it by wrapping the tapered end with a ribbon, piece or twine, wire, or even old copper wires. Remember, you can be creative in what you use.
If you want to add a center to flower, take a small piece or piper cleaner or wire and run it through the bent top of your “stem.” Then curl it, twist it, or place beads, washers or small spring on the end of it to make it pretty.
Make a whole bouquet if you’re ambitious, or give this with your favorite geek mom’s card, on her dinner plate or leave it anonymously at her doorstep with a note “To My Angel.”
Flower accomplished; now your loved one can enjoy a little gift to remind them in just a few short years the Mother Ship will return and change you back into your human form…we hope.


You are officially a bad ass. I love District 9!
Much appreciated, coming from a fellow bad ass-type.
Thank you, kindly, all!